Tabla de contenidos
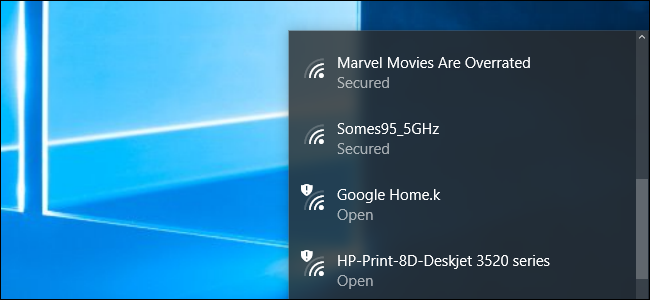
¿Su vecino tiene un nombre de red Wi-Fi desagradable? Puede ocultarlo del menú de Wi-Fi en sus computadoras, evitando que aparezca. También puede ir más allá y bloquear todas las demás redes Wi-Fi, permitiendo que sus PC solo vean y se conecten a las redes Wi-Fi que usted permita.
Esto es útil si un vecino ha decidido un nombre de red que no es apropiado para niños pequeños, o si una red vecina está abierta sin controles parentales. Cualquiera sea su razón, puede evitar que esa red aparezca en cualquier PC con Windows con unos pocos comandos.
Primero: abra una ventana de símbolo del sistema del administrador
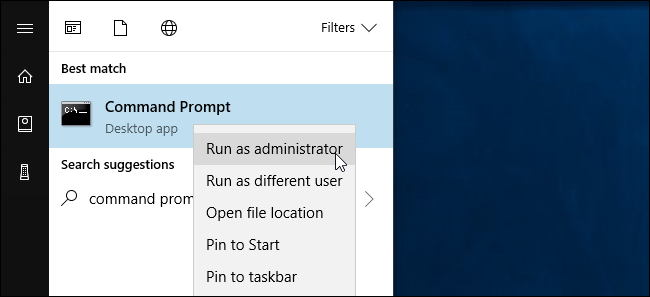
This is accomplished via the netsh command, run as an Administrator. To open a Command Prompt window, open the Start menu, search for Command Prompt, right-click the “Command Prompt” shortcut, and select “Run as administrator”.
How to Blacklist a Wi-Fi Network
You can hide an individual network by adding it to the block list. It won’t appear in the list of nearby available Wi-Fi networks and you can’t connect to it from Windows.
To block a network, run the following command, replacing “WIFI NAME” with the name (SSID) of the wireless network. This is just the Wi-Fi network name that appears in the standard Wi-Fi popup menu.
netsh wlan add filter permission=block ssid="WIFI NAME" networktype=infrastructure

Repeat this process to add more networks to your Wi-Fi blacklist, if you like. This command filters based on the network name. So, if your neighbor renames their Wi-Fi network, you’ll see the new name appear in your Wi-Fi list.
To undo this change and remove a network from the blocklist, run the following command and replace “WIFI NAME” with the name of the Wi-Fi network:
netsh wlan delete filter permission=block ssid="WIFI NAME" networktype=infrastructure

How to Whitelist a Wi-Fi Network
Rather than hiding individual networks, you could alternatively add one or more Wi-Fi networks to the allow list, and then block all other networks. This ensures a device can only connect to the networks you approve. Of course, this is inconvenient if you’re using a portable device like a laptop—if you whitelist only your home network and take the laptop elsewhere, you won’t even be able to see any other Wi-Fi hotspots without changing this setting.
To add an allowed Wi-Fi network, run the following command, replacing “WIFI NAME” with the name (SSID) of the wireless network.
netsh wlan add filter permission=allow ssid="WIFI NAME" networktype=infrastructure

Repeat this process to add more networks to your Wi-Fi whitelist, if necessary.
Once you’ve set a list of your whitelisted networks, run the following command to block all Wi-Fi networks that you haven’t specifically allowed:
netsh wlan add filter permission=denyall networktype=infrastructure

To undo this change, run the following command. Your PC will be able to see and connect to all networks that aren’t on the block list:
netsh wlan delete filter permission=denyall networktype=infrastructure
You can also optionally remove the allowed Wi-Fi network rules you added. Just run the following command, replacing “WIFI NAME” with the name of the Wi-Fi network.
netsh wlan delete filter permission=allow ssid="WIFI NAME" networktype=infrastructure

How to View Your Filters
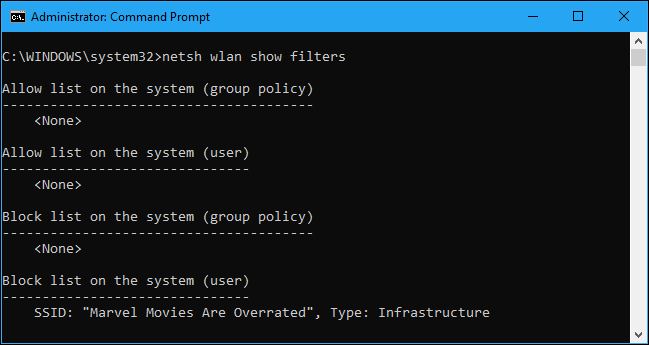
To view active filters you’ve created, run the following command:
netsh wlan show filters
You can use the above commands to delete any filters that appear here. Just use the same command you used to create the filter, replacing the word add with delete in the command.
Anyone with Administrator access to the computer will be able to visit the Command Prompt and undo this change, if they know what they’re doing. So, if you use this to lock down a child’s computer and force them to connect to a Wi-Fi hotspot with parental controls enabled, be aware that child could undo the change if they have Administrator access to the PC (and are good at googling Windows commands).
Network administrators can use Group Policy to roll out Wi-Fi network filters, allowing them to manage which Wi-Fi networks are allowed or blocked on centrally managed PCs.
